跨境独立站开店
Essential for your first Shopify cross-border e-commerce venture! Here's how to set up a multi-currency app.
This guide will show you how to set up multi-currency apps for Shopify. Introduce multi-currency sales, essential for cross-border e-commerce, to your online store and aim to increase your sales.


How you display currency significantly impacts sales when running a cross-border e-commerce business. One cross-border e-commerce site saw a 30% increase in sales simply by switching from Japanese yen to US dollars. If your target users span multiple countries, it's essential to be able to display product prices in local currencies. However, even with Shopify, setting up multi-currency displays can be a bit complicated without using apps. Therefore, this time, we'll introduce apps that can help with multi-currency settings.
We received an article about multi-currency apps from Sekai e Bokan, a Shopify marketing partner that also operates its own cross-border e-commerce site, bigtalljapan.
How you display currency when operating a cross-border e-commerce business significantly impacts sales.
One cross-border e-commerce site saw a 30% increase in sales simply by changing the pricing from Japanese yen to US dollars.
If your target users span multiple countries, it's practically essential to be able to display product prices in local currency.
However, even with Shopify, setting up multi-currency displays is a bit complicated without using an app.
Therefore, this time, I would like to introduce an app that is useful for setting up multiple currencies.
1. Multi-currency display is important for cross-border e-commerce.
Shopify's admin panel has a section where you can set the base currency.
Many people set their base currency to Japanese yen, and if you do, the website will also display prices in yen.
In this case, users who cannot see the price in their own currency may leave the site before comparing options.
Since few overseas users know how much their local currency is worth in Japanese yen, displaying product prices in multiple currencies to suit each user's needs will help them get a basis for comparison and evaluation.
2. How to set up multiple currencies in Shopify
2-1. Introduction to the multi-currency conversion app "BEST Currency Converter"
Introducing BEST Currency Converter, a Shopify multi-currency conversion app that converts the currency set in the admin panel to the currency the user wants to see and displays it.
This app is featured on the official Shopify website, and it's also frequently mentioned in other Japanese articles about Shopify.
Many of you have probably seen this on other Shopify information websites, haven't you?
Free version:
- Five currency conversion settings are available.
- A design template for three currency conversions.
- Free technical support available.
Paid version:
- $9.95 per month (approximately 1100 yen, calculated at 1 dollar = 110 yen).
- 30-day free trial
- The system can automatically convert currency based on the user's location.
- The currency converter function is hidden from the screen and currency conversion is performed in the background.
- In addition to free technical support, design support
- (This allows you to place a currency converter in the appropriate location on your website.)
- Remove the decimal part of the price.
2-2. How to configure detailed settings
Now, let's go over the basic setup steps for the free version.
Figure 1 ① Select General Settings from Settings. Scroll down and you will find a section called Store Currency.
Next, in Figure 1②, select the currency you want to use as the base currency for your shop. (If you are using Shopify Payments and want to change the currency from Japanese Yen, please disable Shopify Payments first.)
Next, select Figure 1 ③ "Change currency format".
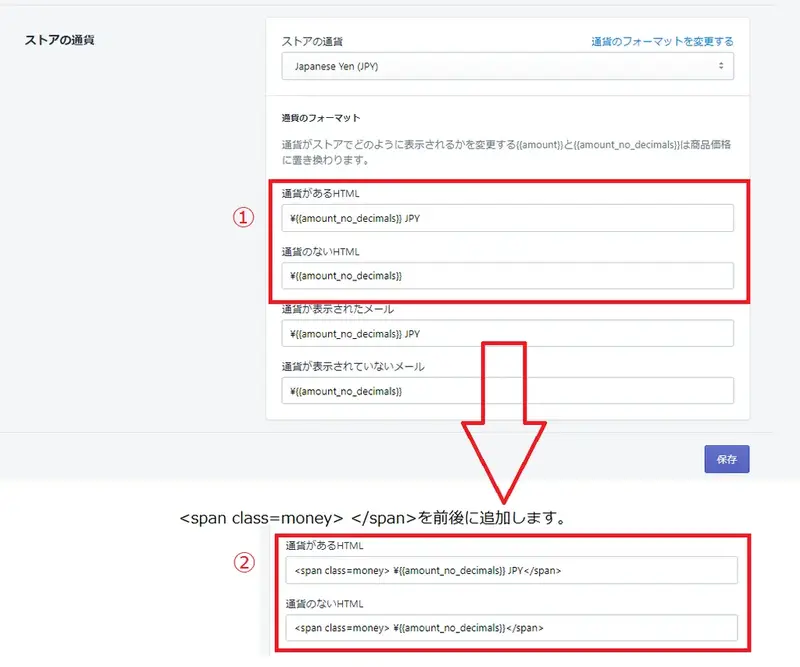
Then, the section for configuring how the currency is displayed on the store will appear in the form shown in Figure 2 ①. As shown in Figure 2 ②, enclose it in a span tag.
If you don't do this, the app won't work correctly when switching currencies, even after you've installed it.
Once the initial setup is complete, we will proceed to the app settings.
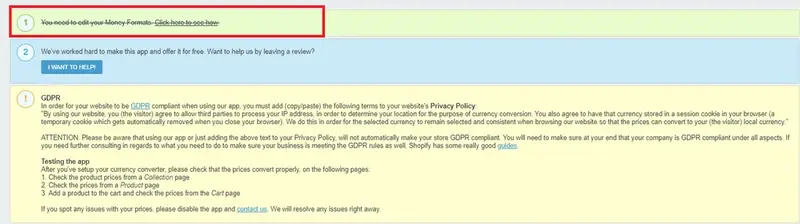
Once you access the app's management screen, you should see a strikethrough, as shown in Figure 3. This is the "Please configure the tags" notice I explained earlier. Be careful not to overlook this, as it can prevent the function from working.
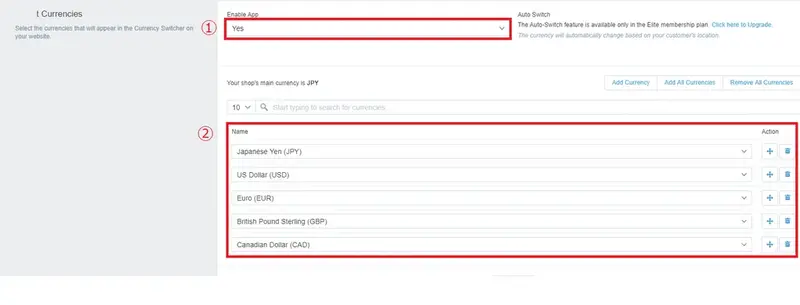
After the explanatory text, there is a section called "Select Currencies" for currency settings.
Figure 4, ①, has "Yes" as the default value. If you want to enable the app, you can leave it as is.
In Figure 4, step ②, select the currency you want to convert.
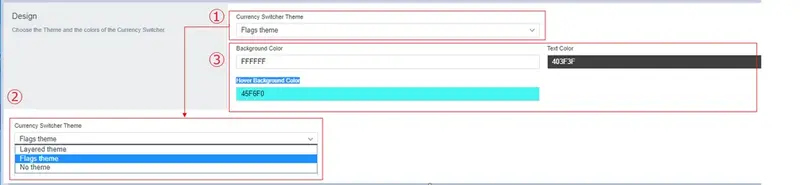
Next, let's configure the design of the currency converter function. In the free version, you can choose from three themes, so open ① in Figure 5 and select your preferred one from ②.
You can also set the color in section ③ of Figure 5 as follows.
- Background Color
- Text Color
- Hover Background Color (Color displayed when the cursor is hovered over)
Once you've completed these steps, the setup is finished. Save and check.
A currency conversion function has been added to the lower left of the screen, as shown in Figure 7.
Selecting the desired currency here will automatically perform the currency conversion and change the amount to the amount you want to see.
If you're curious about how the currency switches or what other features are included before installing the app, a demo site is available, so you can try it out and decide for yourself.
What you should be spending your time on is developing a strategy, not setting up the environment.
While it's possible to set up multiple currencies without relying on an app, it might be a little daunting. The app I've introduced here is free to use, and the paid version offers customizable currency settings, so please give it a try.
It's best not to spend too much time on the setup, and instead dedicate that time to the more important strategic and tactical aspects.
If you are experiencing any difficulties with digital marketing for your cross-border e-commerce site, please consult with our experienced team.
read more
- How to Start Cross-Border E-commerce: Why Shopify is Recommended for Overseas Sales Stores
- [Complete Guide to E-commerce] Shopify is recommended if you want to sell overseas.
- An overview of Shopify's template language, Liquid.
- I found it! A free translation app that's incredibly easy to use.
- Let's start preparing for the transition to displaying total prices.
- [Must-Read Guide] Introducing Payment Services You Can Use with Shopify
- How to use Amazon Pay in your Shopify store
- 11 Shopify Apps to Help You During the Year-End Shopping Season
- Free SMS marketing with Messent
FAQ
Is it okay to use Japanese yen prices on cross-border e-commerce sites?
What are some recommended multi-currency apps?
What are the fees for BEST Currency Converter?
What are the features of the paid version?
Is there a free trial of the paid version?
With the mission of "communicating the charm of Japan to the world," this company, comprised of a multinational team of Americans, French, Australians, and Japanese, specializes in performance-based advertising, content marketing, SEO, and consulting for cross-border e-commerce sites targeting English-speaking audiences. They have a proven track record of increasing sales for cross-border e-commerce sites, including a 14.7-fold increase (to 50 billion yen) for a used car sales site and a 20-fold increase for a matcha and tea utensil sales site. They also operate their own cross-border e-commerce site using Shopify and share the insights gained through this experience on their blog.
Share this article
- Share on Facebook
- Share on X
- Share on LinkedIn